000889
Moje konto

Thermaltake A1658 Hardcano 10
Multifunkčný panelZobraziť viac
Produkt je vyradený !
V našej ponuke nájdete podobné modely. S výberom pomôžeme.
Kód tovaru
PN kód
A1658
Výrobca
Záruka
24 mesiacov

OPÝTAJTE SA PORADCU

Zaradenie produktu
Popis produktu
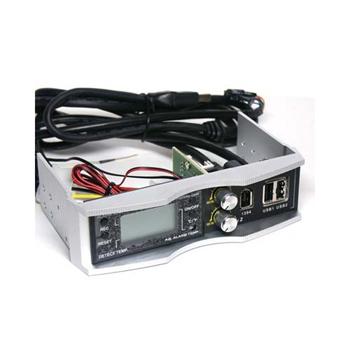
Thermaltake A1658 Hardcano 10
Skvělý produkt v montovatelný do 5,25 pozice, který umožnuje plynulou regulaci až 2 větráčků ve Vašem počítači a tím dokonale ztišit Váš počítač při dobrém chlazení. Navíc obsahuje LCD panel s 1 teplotním čidlem, který umožňují sledovat teplotu a ještě ALARM upozorňující na překročení nastavené teploty. Ukazuje i maximální a minimální naměřenou teplotu.Na tomto panelu najdete též FireWire 1394 port a 2 USB 2.0 porty. Produkt je napájen z 5,25 napájecího konektoru jako disk.
Thermaltake Advanced System Controller
Application:
Design for 5.25’’ drive bay
Temp. alarm LCD monitor
2 adjustable fan speed controllers
1394 firewire, 2.0 USB*2
Aluminum housing
Features
ON / OFF: power on or power off switch.
ºC / ºF: Celsius and Fahrenheit display switch.
RESET: clean the temperature setting. (MAX & MIN)
REC: please adjust the pre-setting temperature by using the cross-head screw driver. When it shows the temperature you would like to set, ( the screen should be shown without MIN or MAX, see figure 1), please press the button to record the temperature.
Alarm Temp. Setting: Control the temperature you would like to set.
Temp. Display with alarm Specification:
Range: 0 ºC ~ 90 ºC (32 ºF ~ 194 ºF)
Resolution: 0.1 ºC (0.1 ºF)
Accuracy: +/-1 ºC (+/-2 ºF)
Sampling rate: 3 sec
Alarm setting range: 40 ºC ~ 90 ºC
Power: Lithium battery CR2032 3V
There are two temperature shown on the screen (T1, T2). T1 always mean pre-setting temperature as well as T2 representatives the temperature from sensor.
Note:
When the screen is shown MAX(Figure 2), it means the highest temperature you have recorded. In the meanwhile, T1 is the highest temperature you set, T2 is the highest temperature that the sensor detected.
On the other hand, MIN (Figure 3)means the lowest temperature that have been recorded.
Fan speed controller operation
If the fan unit you wish to control is over 0.35Amp, please connect it to Speed Controller # 1. However, the total current of fan unit is less than 0.35Amp, please connect it to Fan2.
If you wish to control a fan unit with a 3pin power connection, please use the included CPU Fan Adaptor. Once connected, you may still monitor the RPM by connecting the Yellow wire directly to motherboard.
Example
An efficient way to control the fan units is to chain connect each Silent Fan Units.
Then attach this set to one of the Speed Controllers.
*If 4 or more Silent Fan Units are chain connected altogether, please attach the set to either Speed Controller #2 or #3. This is because each Silent Fan Unit requires 0.10Amp:
[0.1Amp X 4 Silent Fan Units] is greater than 0.35Amp, so it must be connected to Fan2 or Fan3 only.
USB 2.0 & IEEE firewire connections
USB2.0 connection: it is compatible for USB1.1
Please consult your motherboard manual to find out the position of USB 2.0 connection on your motherboard. You can see 9-pins from Hardcano USB2.0.
Find out the following each pin to connect onto your motherboard
USB2.0 connection:
it is compatible for USB1.1 IEEE firewire connection
VCC1 connects to VCC1 or USB+5V or USB Power on your M/B.
DATA-1 connects to USB1- or LDM1 or USB2- on your M/B.
DATA+1 connects to USB1+ or LDP1 or USB2+ on your M/B
GND1 connects to GND1 or GND.
SHIELD connects to NG on your M/B.
VCC2 connects to VCC2 or USB+5V or USB Power on your M/B.
DATA-2 connects to USB2- or LDM2 or USB3- on your M/B.
DATA+2 connects to USB2+ or LDP2 or USB3+ on your M/B
Note: one or two pins may be shown in both rows as NC on some motherboards, please ignore it, NC means empty pin
Identify and find out IEEE 1394 port in the I/O shield (back side of the case), then connect the IEEE 1394 to it.
If you can not find IEEE 1394 port from I/O shield but exist IEEE 1394 function, please install PCI bracket with IEEE 1394 (usually enclosed in the motherboard package), then connect it.
http://www.thermaltake.com/